Navigation

Monday, March 25, 2013

Pleather is the bane of all existence


Ack!  A day late!  Well, the next few weekends may be a bit wonky, but hopefully I'll be able to keep up on crafting.  As an apology/bribe, the Jo-Ann Fabrics in my town has a clearance sale on a lot of their fancy yarns (especially the weird kinds like eyelash).  Your store might not, but it's worth checking in to!

So, this week is finishing the yarn belt and making armbands.

Yarn Belt

So, pleather sucks.  It sticks to the sewing machine.  I have yet to try putting scotch tape on the sewing foot (carefully cutting away the tape over open segments), but it still can stick to the base depending on if you are doing anything double-sided or unlined.  So beware.  (Sewing a pleather corset is a special level of hell, I swear to you.)
But I have a ton of it still, so I'm using it.  For my sanity however, only one side of the belt is pleather.  The other side is black microsuede.  Technically, it's reversible.  I went ahead and sewed the bottom first, sandwiching the yarn between the fabric so that the lacing would end up inside the belt.  
I did not sew through the lace, just the yarn.
In a moment of stupidity, I sewed up the sides next.  In some ways, doing the sides made several things easier, but it made sewing the top a royal pain.
On the one hand, it made it much easier to sew in a little boning and the ties.  
I used simple, plastic boning that's actually meant for you to sew through on a machine (as opposed to the kind with casing).  It's not absolutely necessary, but it gives the belt more structure at the ends and helps keep it from crumpling when you tie it.
One for each side, ends trimmed to a curve.
I sewed the boning on the suede side where the stitching is barely noticeable, and then I got started on the ties.  Instead of grommets/eyelets, this time I turned to some random white rope I've have for years.  I cut two equal lengths and then went about getting them prepped for sewing.
Knot about 3-4 inches from the end and separate all the strands....
...and voila!  A nice, simple tassel.
 After making the tassels, I wanted to do something interesting at the belt level that would also make the cord thinner, AKA easier to sew and less likely to make odd lumps inside the belt.  I unwound the cord a few inches, keeping the strands in pairs.  I carefully knotted them at the fork and the ends.


Be careful knotting at the fork, the braiding likes to do its own thing.
Now, sew everything up, and we get a pretty nifty little look!
Unfortunately, now it's time to sew the top edge.  I decided to be brave and do some contrast stitching, but the pleather made that a minor fiasco.  The pleather stuck at the beginning, leaving me with this nasty mess: 
And then the pleather started rolling out, forcing me to stop, unpick some stitches and start again.  Remember how I warned you that pleather is unforgiving?
You can see how the original stitching left holes and how trying to fix it messed up the line.
So, now I have to add some embellishment to cover the top edge.  I just haven't found something I like for it yet.
Still, we have a pretty much finished yarn belt!

Arm Bands

The other thing I did this week was just a minor project to use some scraps.  I made pleather armbands (just going off general upper-arm circumference), and then, in true DIY form, slipped them inside plastic packing rings that came off two bottles of mead.  (Texas Renaissance Faire Mead all the way.)
The red stuff is the mead bottle packing, trimmed down a bit.
I think it looks pretty cool.  The mead packing can be worn on its own, but the edges can be a little "pokey."  
So, now we're on to hunting for an upper edging on the belt and starting the next belt, I suppose.  I'll also be starting work on mock-ups of a bra top pattern soon.  Let's hope it works!

Sunday, March 17, 2013

Knitting Week


So this week was a week of yarn.  I've been sitting for months on two skeins of Starbella yarn that I got at Christmas, and I decided it was time to experiment.  The yarn itself is very soft, and the colors are vibrant and beautiful.  I was working with Canyon Sunrise, which is a gorgeous blend of blues and a sort of olive-y forest green.

I actually had to look up a few videos to figure out how to knit the stuff, and I found the Ben Franklin Crafts video very helpful.  They recently updated their tutorial on the basic Starbella scarf.  By the way, she's not kidding about the wooden needles.  All of mine are aluminum, inherited from my grandmother, and I was mildly regretting not having wooden needles.  The loops are big, and the yarn does slip around, so you have to be very careful that your stitches don't slide off.  But Starbella knits VERY quickly, so it's not that big a deal.

Starbella Scarf

So I started with a basic scarf but--for curiosity's sake--reversed how I placed the loop while knitting.  I didn't take any pictures, but I went through the front of the loop instead of the back, like you're supposed to.  It made for much tighter stitches, and the final result was a much smaller scarf diameter.  Given the fluffiness of the yarn, though, I actually like this better than the usual pattern's results.


Starbella Mini Hip Scarf (or Shawl)

Back in the day, I used a very simple shawl pattern (you can find it anywhere on the internet, either as yo before or in the first stitch), and I really liked how easy it was and how quickly it went.  Plus, it could technically be used as a hip scarf and easily embellished on the edges. Obviously, with plain yarn, it's nothing super special on its own, but I wanted to see how it would work with Starbella.  

I really like the shape and texture of the final project, but one skein doesn't make for a very wide scarf, so it would probably look better on a girl with slimmer hips. But from the side, it's quite flattering, I think! 


Perhaps the one downside to Starbella is that it you cannot stitch in beads, bells, or other embellishments like you could on regular yarn.  Still, such things could be sewed in by hand later.


Yarn Belt (in progress)

The Starbella pieces went so quickly (while watching season 4 of Supernatural), I decided to start working on a tribal bellydance yarn belt as well.  

Michael's had a sale on Bernat Knit or Knot when I went to pick up materials to finish the red/black bellydance top, and I couldn't pass up the opportunity to get a perfect, pre-mixed selection of yarns.  I made myself stick to a black and white set ("Jessie") and a purple one, since those are my current and projected color schemes.  


I've never done one of these before, and there are no general tutorials that I've seen, so I'm making it up as I go.  The basic idea is to sew a line of hanging yarn along the bottom edge of a belt.  Trying to pin and sew would be a monumental pain.  Attaching the yarn with a line of caulk or hot glue before sewing might work, but I don't want caulk and hot glue potentially messing up my beloved sewing machine.  It might be fine sewing carefully with a zipper foot, but this time we're sticking to fabric-esque materials.  

So, to play it safe, I grabbed some spare leather lace (suede), and decided to tie the yarn to it with a simple cow's hitch or lark's head knot.  Doing it this way means that I can easily fix mistakes and make sure I don't end up with any unintended "bald spots."  I'll still have to be careful when I sew up the belt, but it shouldn't be too bad.
Here you can see the knots on the lace.  The lace won't show once everything's sewn up.
The other consideration was how long to make the yarn strands.  The "Knit or Knot" individual yarn strands are pretty long, even folded in half for this particular type of knot, but I wanted a fairly solid line of yarn for my 45" hips.  I also have relatively short legs, so I decided to cut the yarn in half.  At that length, the knotted yarn on the lace hits about knee length instead of ankle.  

Now, I need to make the belt itself, sew everything up, decide on any embellishments, and decide on how the belt will tie on.


Sunday, March 10, 2013

Red and Black Top (cont.) and Belt


The Top

The goal this week was to finish the top from last week and at least make good headway on the belt.  Goal accomplished.

Michael's was having a convenient sale yesterday, and I was able to get a good pendant and a few accent beads (as well as two other future project items) for a very good price.


The pendant attached to the chain lining the top of the bra with a small jump ring.  More jump rings, a few head pins and some leftover silver chain lent themselves to a nice, dangly addition to the pendant.


The only other thing the top still needed was straps.  The original bra straps served as a rough guide for the new straps.  I put a little curve into the extended portion so that they could be tied as halter straps.  Tying isn't the best option for pleather, as too much strain eventually pulls apart the faux leather surface, but I figured the wear in a less noticeable area wasn't too bad for the benefit of customized length and tension.


A few runs through the sewing machine and a little hand stitching to attach them to the bra itself and ta da!

One finished bellydance top.


The Belt

For the belt, I didn't have enough of the materials to make a perfect stylistic match to the bra, so I experimented.

First, I cut out the base, with pleather for the outside, non-stretch black fabric for the inside, and a little bit of light interfacing.  The latter would have been better replaced with stronger interfacing, but, again, I was working with what I had.


Before the top and bottom were sewn up, I needed to start working on the details.  I wanted to do a panel of interlaced red ribbon but ran out of red, so I had to improvise.  I created a criss-cross of red ribbon on a white background, using Sobo fabric glue to tack everything together.


Sewing the top and bottom finished this section up, and now it was time for the tassel trim.  I had enough black left over to cover the entire base of the belt, but I didn't have enough red.  With the advice of my honey, I decided to have the black overlap the red on the sides.  To avoid getting the trim stuck in the sewing machine foot, I went ahead and stitched it on by hand, starting and ending with slip-stitching the side seams.


 The belt also needed grommet for laced ties, so I went ahead and added those in.


So here it is, the (semi) completed belt (very much in need of careful ironing).  As you can see (and as the Mr. pointed out), the ribbon creates a very different look from the bra .  I was originally planning on adding cowrie shells, but they just didn't look right.  I don't think sequins would be quite appropriate either.  Mr. CouchCrafting suggested red tulle along the top, like the bra, which I may do if I can find similar tulle at a good price.


I kind of like the simplicity, but at the same time, I feel like it still needs a little something more.  Ideas?  Perhaps some design "embroidery" with more silver chain?


Sunday, March 3, 2013

Black and Red Bellydance Top


So, I've made myself promise that I won't buy new fabric for bellydance costumes or other sewing ventures until I make a significant dent in what I already have.

The first of these "stockpile" projects is a black and red bellydance top (and belt to follow).  I started with several yards of stretch black pleather and a few yards of red and black tassel trim.

Unfortunately, I didn't take pictures of the early stages, so I'll keep this part brief. I started by covering an old bra with the pleather.  There are a ton of good tutorials on how to do this, but this time I followed Shushanna's tutorial.  (Another great tutorial is on Shira's website.)  I did it all by hand, so it took a while, but it worked out fine.

After that, I hand-stitched the black tassel trim along the bottom of the bra cups and red from the straps along the midline.  Lastly, I had some random red tulle (from a Christmas present bow, actually!) that I hand-gathered and stitched along the top of the cups.

Here you can see the corner of the infamous couch.
Recycling X-Mas present ribbon FTW.
At this point, I knew I had a good start, but the bra needed something.  It needs a brooch or kuchi in the middle (still on the hunt for a good one), but I wanted it to have some extra spunk.

You can see the start of my plan with the upper right picture--originally, I was just going to add some silver chain loops from the bottom of the bra, but while I was sizing it, I realized that the chain looked great against the pleather (I can't imagine how this would sound out of context!).  So I decided to stitch the chain to the top edge as well as the bottom of the bra, just at the top of the black trim.


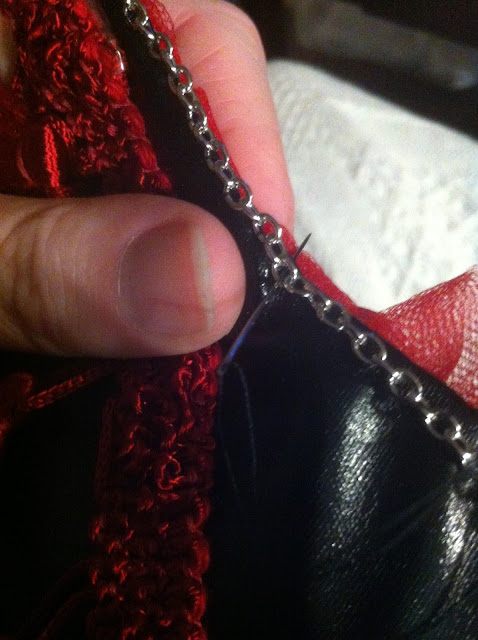
I put a stitch through every other link, sewing the ones that sat vertically on the bra edge.
Start with the needle coming through the back, near the top.
You have to be careful stitching pleather, because the holes don't go away
if you mess up and need to undo your work.
It's a little hard to see, but I put the needle through the link and through the top edge of the bra.
Ta da!  Part one, done!
I used the same method above the black trim.  After that, I added two loops of chain under the cups, stitching the top link of each end to the bra.  All together, it probably took between 2-3 hours while watching the original Beauty and the Beast TV show with Ron Perlman and Linda Hamilton.  I will say, make sure you have good light and keep your shoulders relaxed.  I had one heck of a neck-ache afterwards!

Sorry for the poor lighting!
I've still got a bit to do.  I need to add straps and find and add a brooch in the center, but that should come together easily enough.  Then, it's on to the belt!

Friday, March 1, 2013

Welcome!  Couch Crafting is all about crafting whatever, wherever.  I just happen to do a lot of mine from the couch (and the floor).

Whether you're like me and you've constructed a paper mache' weapon by propping it off the floor with tupperware, 2 feet from the TV, or if you have one of those beautiful crafting rooms I envy on Pinterest, it's all about creating.

Sometimes we let life get in the way of being productive, doing the things we dream about.  This blog is my promise to myself to not let that happen, and at the same time it's a place to share my ideas, inspiration, and creations.

I look forward to getting to know you!